How to run a HTML5 VR-Tour OFFLINE on Android
- Attila Farkas

- Aug 8, 2020
- 3 min read
Updated: Aug 11, 2020
After creating the spherical panoramas, the next step is to create the virtual tour. There are many methods and programs for this, I use Pano2VR. One of the outputs of this program is an HTML5 type website. Because of the WebGL feature, a web server is required to run the virtual tour. Some browsers still support offline use, but none on Android.

But let's start at the beginning. I’ve always wanted a portable device. Something easy to carry, yet versatile, strong and not too expensive. If I don’t have to, I won’t take a laptop with me everywhere. The Samsung Tab S4 tablet seemed like a pretty good choice, until I realized that android internet browsers no longer allow to run (HTML5 based) VR-Tours offline. And I know there are a few other methods as well, but tablet manufacturers have been convincing customers for a few years that tablets aren’t just a big smartphones. Aren’t they?
Anyway. Before we get started, it is IMPORTANT to note, that this method is not guaranteed to work in all cases. The wide variety of Android devices, operating systems, and software versions are endlessly unlimited and unpredictable combinations. Let's see my configuration:
- SAMSUNG Galaxy Tab S4
- Android 10.0
- Web Browsers:
- Opera ( ver.: 59.1.2926.54067 )
- Chrome ( ver.: 84.0.4147.111 )
- Firefox ( ver.: 68.8.1 )
First, the most important thing we will need is a web server app. Because no browser allows on Android to run an offline web pages anymore. There are many types of web server apps available in the Google Play store, but for me, only one worked. And this is the kWS - Android Web Server. Free, simple and easy to use.

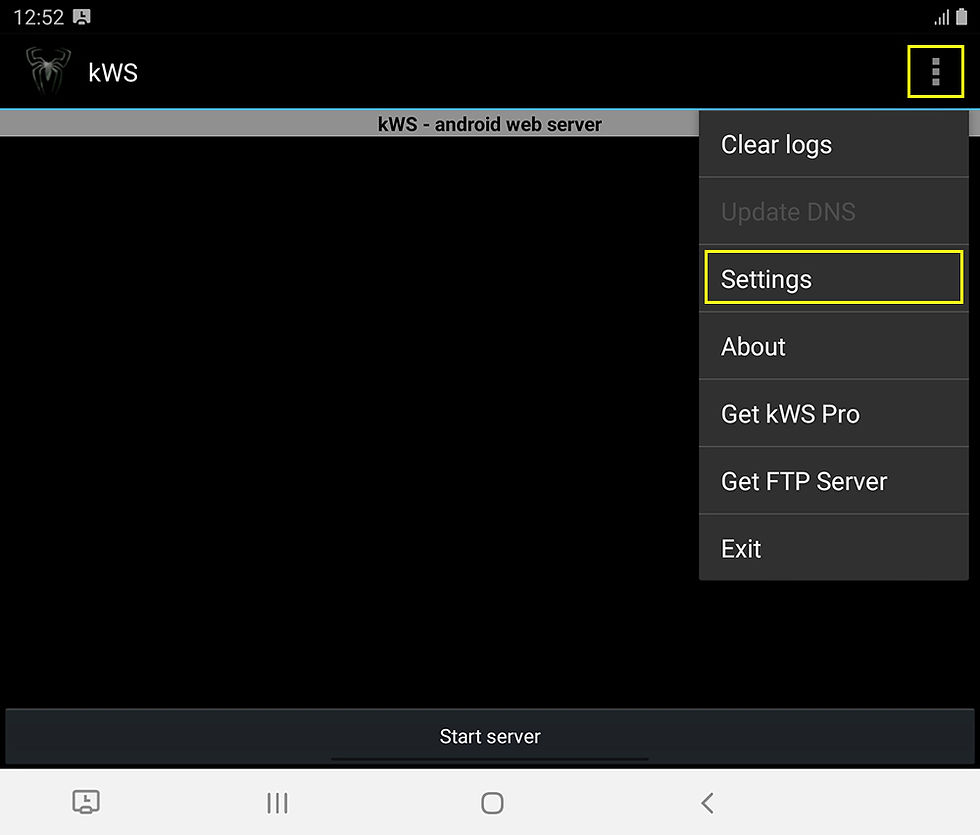
Install the app, and launch it. First go to the Settings:

Check the Port settings. The default value should be 8080. Only change this if port 8080 does not work for some reason.
The only important Setting for us is to specify the Home directory, and that’s where things start to get a little complicated. On Android, it is not so easy to determine the path to a particular file or folder. That's where Android devices and operating systems could be very different. To find our folder, containing our virtual tour, we will need a web browser. Unfortunately, it does matter which one we use.
In my case, Chrome and Firefox did not allow full insight into the storage folder structure, but for me, Opera was always the best Android Web Browser anyway. So open Opera and type the following in the address bar:
file:///storage/

If you have an sd card in your device too, in the browser will be one more folder with numbers and letters (for example: 50E8-9BE8). If you click on it, the contents of the SD card will be listed. But first we deal with the device's internal storage, because sadly it can't be accessed with just one click.
Clicking on the emulated folder does nothing (at least in my case), but it's our way to success. ;) Put a following line into the address bar:
file:///storage/emulated/0/
With some luck, you will see the folder structure of your device's internal storage. If so, you can create a working path to the server's Home directory.
So, if you create (for example) a folder called Pano2VR in the main directory of your internal storage, and copy the contents of your virtual tour into it, you should get the following path about your VR-Tour folder in the address field:

Copy the grey part of that address, and go back to the kWS app, and paste it into the Home directory field, like this:

Hit OK, and exit from the Settings menu. Click on the bottom of the screen on the Start server button, and if everything is fine, the server has started properly.

Switch back to Opera, or any other browser (in that case it doesn't matter anymore), and put your localhost adress with the port number in your address field. In my case
127.0.0.1:8080
And that's it.
One more thing!
If we copy some media (pictures, videos, etc.) to an android device, the system will list it for the corresponding application. For example, image files appear in the gallery application.
In the case of a web-based VR-Tour, since they contain a lot of image files, even if we copy only one Tour to the device, we will still litter our gallery with tons of images.
To prevent this, simply create an empty file in the main folder of the vr tour with the following name:
.nomedia
Hope this tutorial helped.
Have a great day!


Comments